Soft & Chewy Gluten-Free Pita Bread
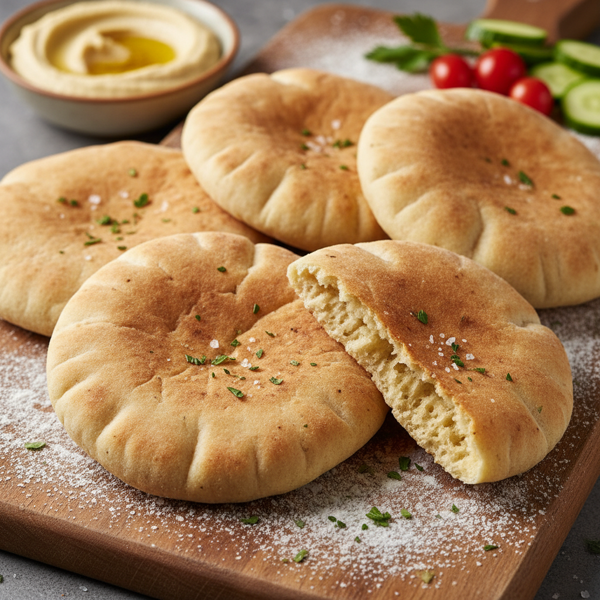
Enjoy the delightful softness and chewiness of homemade gluten-free pita bread with this easy-to-follow recipe. Perfectly adapted from Carol's Easy Pita Bread Recipe #8970, this version utilizes gluten-free ingredients and an automatic bread maker to simplify the process. With a blend of cornstarch, tapioca starch, and garbanzo flour, these pitas bake up light and fluffy, forming perfect pockets for your favorite fillings. Ideal for wraps, dips, or as a side with meals, these pita breads will impress everyone, gluten-free or not! Make a batch today and enjoy fresh, warm pitas right out of the oven.
N/A
Servings
N/A
Calories
9
Ingredients
Ingredients
Cornstarch
1 1/3 cups (None)
Tapioca starch or flour
1 cup (None)
Garbanzo flour or garfava flour
2/3 cup (None)
Sorghum flour
1/3 cup (None)
Sugar
2 tablespoons (None)
Xanthan gum
1 tablespoon (None)
Quick-rising yeast
2 1/4 teaspoons (None)
Salt
1/2 teaspoon (None)
Warm water
1 1/4 cups (Warmed to about 110°F (43°C))
Instructions
1
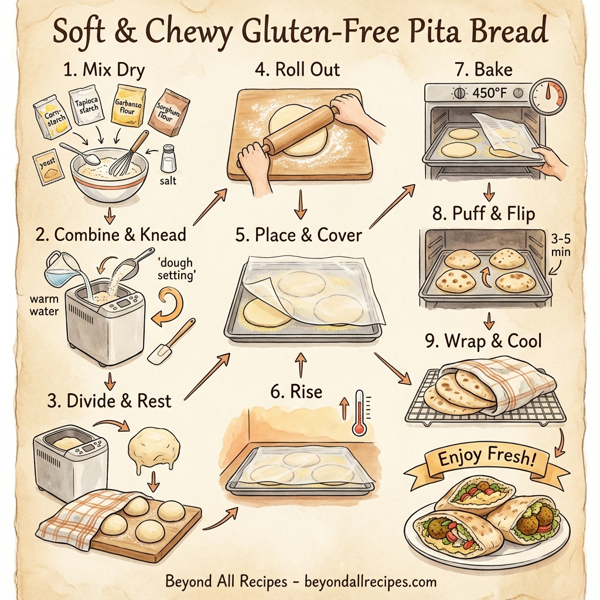
In a large mixing bowl, combine the cornstarch, tapioca starch, garbanzo flour, sorghum flour, sugar, xanthan gum, quick-rising yeast, and salt. Mix well and set aside.
2
Pour the warm water into the bread maker pan. Gradually add the dry ingredient mixture to the pan, ensuring all ingredients are well incorporated.
3
Set the bread maker to the dough setting and turn it on. Use a spatula, if needed, to scrape down the sides and ensure a homogeneous dough. The resulting dough will be soft and sticky.
4
Once kneading is complete (approximately 5 minutes), remove the dough from the pan. Divide it into 6 to 8 equal balls. Cover the dough balls with a towel to prevent drying.
5
On a board dusted generously with cornstarch, roll out each dough ball to about a 6-inch diameter and 1/4-inch thickness. The dough is sticky, so use light hands and additional cornstarch as needed for rolling.
6
Place the rolled-out pitas onto a lightly greased cookie sheet that is sprinkled with cornmeal or gluten-free flour. Cover the sheet with waxed paper to keep the pitas moist.
7
Allow the pitas to rise in a warm place for approximately 30-40 minutes.
8
Preheat your oven to 450°F (232°C). Carefully remove the waxed paper and flip the pitas over.
9
Bake the pitas for 3-5 minutes until they are puffed and lightly browned. Flip them again and return to the oven for another 3-5 minutes until they are just set.
10
Remove the pitas from the oven and wrap them immediately in a clean kitchen towel for 3-4 minutes to maintain their softness.
11
Once slightly cooled, split the pitas along the 'pocket' edge using a sharp knife and fill them with your desired fillings. Serve immediately or store in the freezer for later use.
Nutrition Information
Frequently Asked Questions
Frequently Asked Questions
What is the primary texture of this gluten-free pita bread?
This gluten-free pita bread is designed to be soft and chewy, mimicking traditional pita texture.
Which flours are used in this gluten-free recipe?
The recipe uses a blend of cornstarch, tapioca starch or flour, garbanzo or garfava flour, and sorghum flour.
Do I need a bread maker for this recipe?
Yes, this recipe utilizes an automatic bread maker on the dough setting to simplify the kneading process.
What bread maker setting should I use?
You should use the standard dough setting on your bread maker.
How long should the dough knead in the bread maker?
The dough should knead for approximately 5 minutes until it is homogeneous.
Is the pita dough supposed to be sticky?
Yes, the resulting dough will be soft and sticky, which is normal for this gluten-free recipe.
How many pitas does this recipe produce?
The recipe makes between 6 to 8 equal-sized pita breads.
What is the recommended thickness for rolling out the dough?
Each dough ball should be rolled out to about a 1/4-inch thickness.
What diameter should the pitas be rolled to?
The pitas should be rolled out to approximately a 6-inch diameter.
How do I prevent the sticky dough from sticking to the board?
Dust the rolling board generously with cornstarch and use light hands with additional cornstarch as needed.
How should I prepare the cookie sheet for baking?
Lightly grease the cookie sheet and sprinkle it with cornmeal or gluten-free flour.
How long do the pitas need to rise before baking?
Allow the pitas to rise in a warm place for approximately 30-40 minutes.
What temperature should the oven be set to?
Preheat your oven to 450 degrees Fahrenheit (232 degrees Celsius).
How do I keep the pitas moist while they are rising?
Cover the cookie sheet with waxed paper to maintain moisture during the rising period.
Do the pitas need to be flipped before baking?
Yes, carefully remove the waxed paper and flip the pitas over just before placing them in the oven.
What is the total baking time for the pita bread?
They bake for 3-5 minutes on one side, then another 3-5 minutes after flipping, for a total of 6-10 minutes.
How can I tell when the pitas are finished baking?
The pitas should be puffed and lightly browned when they are ready.
What is the secret to keeping the pitas soft after they come out of the oven?
Immediately wrap the hot pitas in a clean kitchen towel for 3-4 minutes to trap steam and maintain softness.
How do I create the pocket in the pita bread?
Once slightly cooled, use a sharp knife to split the pitas along the edge to reveal the pocket.
Can these pita breads be frozen for later use?
Yes, these pitas can be stored in the freezer and reheated later.
What type of yeast is required for this recipe?
The recipe calls for 2 1/4 teaspoons of quick-rising yeast.
What should the temperature of the water be?
The water should be warmed to approximately 110 degrees Fahrenheit (43 degrees Celsius).
What is the role of xanthan gum in this recipe?
Xanthan gum acts as a binder and provides the elasticity usually found in gluten-based breads.
Are there any specific serving suggestions for these pitas?
They are ideal for wraps, served with dips, or as a side bread with meals.
Can I substitute garfava flour for garbanzo flour?
Yes, the recipe allows for either garbanzo flour or garfava flour.
Why is sugar included in the recipe?
Sugar helps to feed the yeast and contributes to the browning and flavor of the bread.
What original recipe was this version adapted from?
It was adapted from Carol's Easy Pita Bread Recipe #8970.
Should I use a spatula during the bread maker process?
Yes, use a spatula if needed to scrape down the sides of the pan to ensure all flour is incorporated.
How much salt is used in the recipe?
The recipe requires 1/2 teaspoon of salt.
Why do I need to cover the dough balls with a towel?
Covering the dough balls with a towel prevents them from drying out while you work on rolling the others.