Quick & Creamy No-Churn Ice Cream
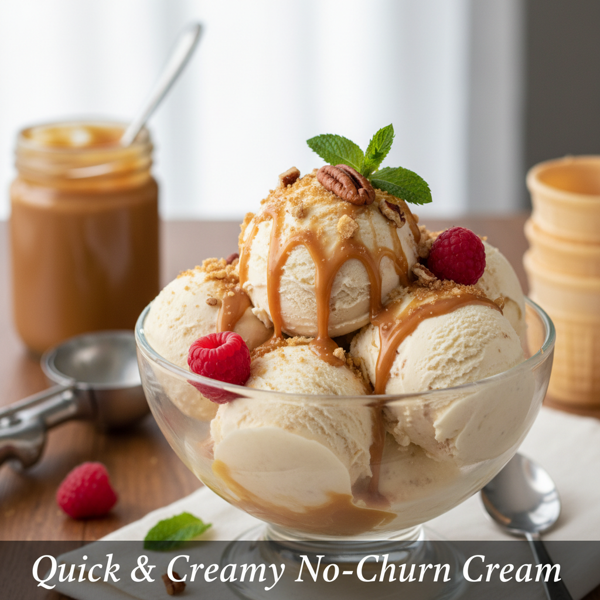
This Quick & Creamy No-Churn Ice Cream recipe is the ultimate solution for those unexpected cravings for a sweet, frozen treat. It's super simple and takes only minutes to prepare, making it an educational and fun project for both kids and adults alike! Based on a classic science experiment, you can customize it by adding your favorite flavors or mix-ins such as chocolate syrup, crushed cookies, or a dash of malted milk powder. Perfect for birthdays, summer gatherings, or anytime you want to beat the heat, this delightful treat is sure to impress friends and family without the need for an ice cream maker!
N/A
Servings
N/A
Calories
5
Ingredients
Ingredients
1% low-fat milk
1 cup (Any kind of milk can be used; 1% is commonly available.)
Sugar or artificial sweetener
2 tablespoons (Choose according to your preference.)
Vanilla extract
1 teaspoon (For flavor enhancement.)
Ice cubes
3 cups (Use fresh ice cubes from freezer.)
Rock salt
1/4 cup (Any variety of salt can be used.)
Instructions
1
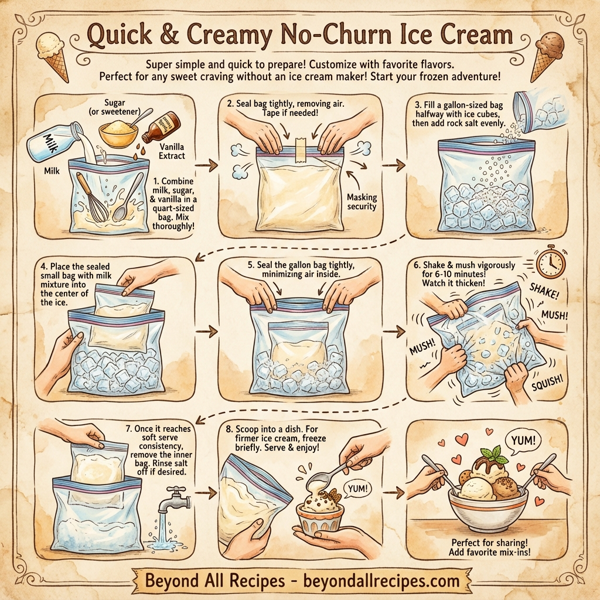
Start by combining milk, sugar (or sweetener), and vanilla extract in a quart-sized Ziploc plastic bag. Make sure all the ingredients are mixed thoroughly.
2
Seal the small bag tightly, ensuring to remove as much air as possible to prevent leaks (if you're concerned, you can tape it up for extra security).
3
In a larger gallon-sized Ziploc plastic bag, fill it halfway with ice cubes, then add the rock salt evenly over the ice.
4
Place the sealed quart-sized bag with the milk mixture into the larger bag with ice, making sure it’s centered among the ice.
5
Seal the gallon-sized bag tightly, again ensuring minimal air inside. This is essential for proper freezing.
6
Now comes the fun part! Shake, mush, and squish the bag vigorously for about 6-10 minutes. The ice cream mixture will start to thicken and freeze as the ice and salt work their magic.
7
Once the mixture reaches a soft serve consistency, carefully remove the inner bag. You can rinse off any salt if desired.
8
Scoop out the ice cream with a spoon or pour it into a small dish. For firmer ice cream, you can place the bag in the freezer for a short while.
9
Serve and enjoy your homemade ice cream, sharing with family and friends!
Nutrition Information
Frequently Asked Questions
Frequently Asked Questions
What is Quick & Creamy No-Churn Ice Cream?
It is a simple, frozen treat made using a bag-in-bag method without the need for an expensive ice cream maker.
How long does it take to make this ice cream?
The shaking process takes between 6 to 10 minutes until the mixture thickens.
What ingredients are required?
You need 1% low-fat milk, sugar or sweetener, vanilla extract, ice cubes, and rock salt.
Can I use different types of milk?
Yes, while the recipe suggests 1% low-fat milk, any kind of milk can be used.
What is the purpose of rock salt?
The rock salt lowers the freezing point of the ice, which allows the milk mixture to freeze into ice cream.
Can I use regular table salt instead of rock salt?
Yes, any variety of salt can be used for this process.
How many bags do I need?
You need two Ziploc bags: one quart-sized bag for the ingredients and one gallon-sized bag for the ice and salt.
What flavor is this ice cream?
This recipe makes a classic vanilla ice cream using one teaspoon of vanilla extract.
Can I add mix-ins like cookies?
Absolutely! You can customize it by adding crushed cookies, chocolate syrup, or malted milk powder.
How do I prevent the bags from leaking?
Ensure you remove as much air as possible before sealing, and you can use tape for extra security.
Is this recipe suitable for kids?
Yes, it is an educational and fun project that is perfect for children and adults alike.
Why do I need to remove air from the bags?
Removing air is essential for proper freezing and helps prevent the bags from popping during shaking.
What consistency should I expect?
The result is typically a soft-serve consistency immediately after shaking.
How can I make the ice cream firmer?
For a firmer texture, place the quart-sized bag in the freezer for a short while after shaking.
Should I rinse the bag after shaking?
It is recommended to rinse off any salt from the outside of the inner bag so it doesn't get into your ice cream.
What is the ratio of ice to salt?
The recipe calls for 3 cups of ice cubes and 1/4 cup of rock salt.
Can I use artificial sweetener?
Yes, you can substitute the 2 tablespoons of sugar with an artificial sweetener of your choice.
Is an ice cream maker required?
No, this is a no-churn recipe that requires only your hands to shake the bag.
What are the steps for shaking?
You should shake, mush, and squish the bag vigorously for 6-10 minutes.
Can I make this for a party?
Yes, it is a great activity for birthdays, summer gatherings, or any time you want a quick treat.
Is this a science experiment?
Yes, it is based on a classic science experiment involving endothermic reactions.
How much sugar is needed?
The recipe requires 2 tablespoons of sugar or sweetener.
How much milk is used?
The recipe uses 1 cup of 1% low-fat milk.
Can I use malted milk powder?
Yes, malted milk powder is a suggested mix-in for extra flavor.
What happens if the bag leaks?
If the outer bag leaks, it may be messy; if the inner bag leaks, the salt water will ruin the ice cream flavor.
Can I use fresh ice?
Yes, the recipe specifies using fresh ice cubes from the freezer.
What do I serve the ice cream in?
You can scoop it into a small dish or eat it directly from the bag with a spoon.
Is this recipe fast?
Yes, it takes only minutes to prepare and finish.
Can I double the recipe?
It is best to make individual batches to ensure the ice and salt can freeze the mixture effectively.
Is the ice cream smooth?
Yes, the shaking and mushing process helps create a creamy, smooth texture.