Playful Easter Bunny Cake
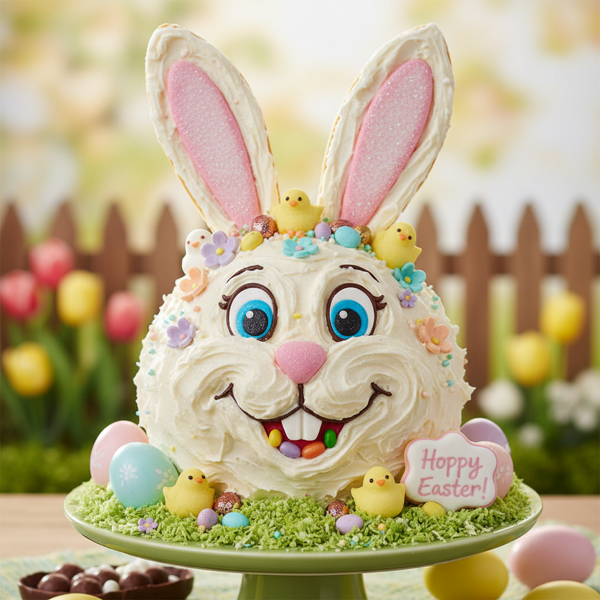
Hop into the Easter spirit with this delightful Playful Easter Bunny Cake! A nostalgic treat that echoes the joys of childhood baking, this whimsical cake is perfect for holiday gatherings and family fun. With its vibrant coconut coating and sweet jelly bean decorations, this cake is both charming and delicious. Whether you choose to stick with a classic white bunny or unleash your creativity with color, this cake will not only bring smiles but also delicious flavor to your celebration. The sturdy layers and fun assembly make it a fantastic project to enjoy with kids, encouraging their artistic side as they decorate their fluffy friend. Let's make Easter sweeter together!
N/A
Servings
N/A
Calories
9
Ingredients
Ingredients
White cake mix
1 (18 ounce) box (Prepare according to package instructions for two 9-inch round layers.)
Eggs
3 (Use as called for by your cake mix.)
Oil
1/3 cup (Use as called for by your cake mix.)
Water
1 1/3 cups (Use as called for by your cake mix.)
White frosting
1 (16 ounce) can (Can be store-bought or a homemade recipe is fine.)
Coconut (shredded or flaked)
1 (14 ounce) package (For decoration.)
Ribbon
1/2 yard (For bow and decoration.)
Food coloring
To taste (Use to tint frosting and coconut.)
Jelly beans or gumdrops
To taste (For decorating the bunny's face and features.)
Instructions
1
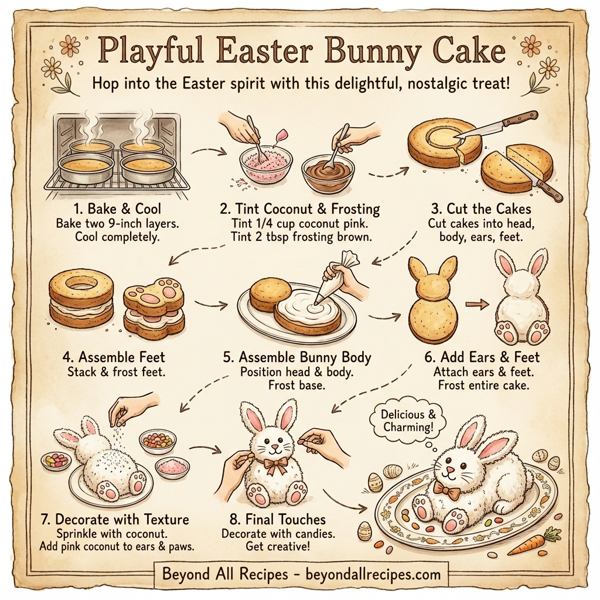
1. Preheat your oven and prepare the cake mix according to the box instructions to bake two 9-inch round layers.
2
2. Once the cake is done baking, allow them to cool completely. While waiting, tint 1/4 cup of shredded coconut pink for the bunny's inner ears and paws, and set aside.
3
3. In another bowl, tint 2 tablespoons of frosting brown for detailing the bunny's face and feet.
4
4. Carefully cut one of the round layers into eight pieces, reserving the center for the head. Cut the second round layer to use as the lower part of the bunny's body.
5
5. For the feet, frost the tops of four outer ring pieces and stack one on top of another, creating two layered feet. Frost the tops and sides for a smooth finish.
6
6. Position the round piece you cut earlier at the top edge of a square piece to form the bunny’s head and body while ensuring it's stable.
7
7. Form the ears by frosting two sets of the remaining side pieces together at the flat edges and place them atop the head.
8
8. Frost the entire cake smoothly and attach the feet two on each side of the body securely.
9
9. Generously sprinkle the flaked coconut over the frosted bunny to create texture, then decorate with jelly beans or gumdrops for the eyes, nose, and any additional decoration, using the pink-tinted coconut for the inner ears and paw pads.
10
10. Get creative! Add a charming bowtie with ribbon, fashion some buttons from your candies, or even create a festive Easter hat for your bunny.
11
11. Pro tip: If you don’t have a pastry bag, spoon frosting into a small plastic baggie, twist the end, and snip off a corner for easy piping.
12
12. Remember to use a large platter so your finished cake has plenty of room; it will be nearly 2 feet long!
13
13. Slice and serve your delicious creation, making sure to enjoy the fun of eating your art!
Nutrition Information
Frequently Asked Questions
Frequently Asked Questions
What is a Playful Easter Bunny Cake?
It is a whimsical, nostalgic Easter-themed cake shaped like a bunny, covered in coconut fur and decorated with colorful candies.
What size cake pans are required for this recipe?
You will need two 9-inch round cake pans to bake the layers for the bunny's body parts.
How do I create the pink color for the bunny's ears?
Tint 1/4 cup of shredded coconut with pink food coloring to use for the inner ears and paw pads.
What can I use for the bunny's eyes and nose?
You can use jelly beans or gumdrops to create the facial features.
How long is the finished bunny cake?
Once assembled, the finished cake will be nearly 2 feet long, so ensure you have a large enough platter.
How do I make the bunny's feet?
Stack and frost four outer ring pieces cut from the cake layers to create two sturdy, layered feet.
What is the purpose of the brown frosting?
Small amounts of brown-tinted frosting are used for detailing the bunny's face and feet.
Can I make this cake with my children?
Yes, this is a fantastic project for kids that encourages their artistic side through assembly and decoration.
How do I pipe frosting if I don't have a pastry bag?
Spoon the frosting into a small plastic baggie, twist the end, and snip off a corner for easy piping.
What type of coconut is best for this recipe?
You can use either shredded or flaked coconut to create the fluffy fur texture.
How many cake layers are needed?
The recipe requires two 9-inch round cake layers.
How do I assemble the bunny's head?
The head is formed using a round center piece cut from one of the cake layers.
Can I add clothing to the bunny?
Yes, you can get creative by adding a ribbon bowtie or fashioning buttons and a hat from candies.
How do I make the bunny's ears?
Frost two sets of side pieces together at the flat edges and place them at the top of the head.
What ingredients are needed for the cake base?
A standard white cake mix, 3 eggs, 1/3 cup of oil, and 1 1/3 cups of water are used.
How much frosting does the recipe call for?
You will need one 16-ounce can of white frosting, or an equivalent amount of homemade frosting.
Should the cakes be warm when cutting?
No, you must allow the cakes to cool completely before cutting to ensure the pieces are stable and easy to handle.
How do I secure the feet to the body?
Attach the two stacked feet to each side of the body securely using frosting as an adhesive.
Can I change the bunny's color?
Yes, while classic white is popular, you can tint the coconut with different food colors for a unique look.
How much ribbon is suggested for decoration?
About 1/2 yard of ribbon is recommended to create a charming bowtie.
What is the best way to apply the coconut?
Generously sprinkle the flaked coconut over the freshly frosted cake to create a textured fur appearance.
What should I use for the bunny's buttons?
You can use jelly beans or gumdrops to create buttons on the bunny's body.
Is the ribbon edible?
No, the ribbon is for decoration only and should be removed before serving the cake.
How do I make the bunny's face more detailed?
Use a small amount of tinted frosting to pipe fine lines for the whiskers or toes.
Can I use a different cake flavor?
Yes, while the recipe suggests white cake mix, any flavor of 9-inch round layers will work.
How do I tint the coconut?
Place the coconut in a bowl or bag with a few drops of food coloring and mix until the desired shade is achieved.
What size is the coconut package?
The recipe uses one 14-ounce package of shredded or flaked coconut.
Is this a good holiday activity?
Absolutely, it is designed to bring family fun and a festive spirit to Easter celebrations.
How do I ensure the bunny is stable on the platter?
Position the pieces closely and use frosting to 'glue' them to each other and the platter.
What is the final step before serving?
Slice and enjoy your creation, celebrating the fun of eating your edible art!