Colorful Candy Cone Treats
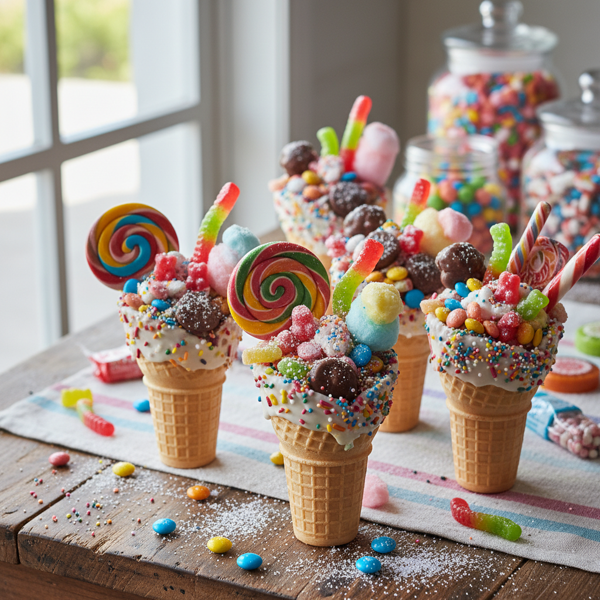
Brighten up any celebration with these delightful Colorful Candy Cone Treats! Inspired by a fun-filled episode from Food Network, these creative treats serve as both delicious desserts and whimsical party favors. Perfect for birthday parties, holidays, or bake sales, they bring joy to kids and adults alike. The recipe allows you to unleash your creativity by customizing the candy fillings and decorative toppings. With easy-to-work-with candy coatings from craft stores and your choice of candies like Smarties, M&M's, or Twizzlers, each cone transforms into a delightful surprise. Add some colorful ribbons, and you've got a treat that's as eye-catching as it is tasty!
N/A
Servings
N/A
Calories
7
Ingredients

Ingredients
Ice cream cones
24 (Flat-bottomed)
Lollipops
24 (Or 72 mini lollipops)
Pixie sticks
72 (N/A)
Chocolate chips or melting candy
1 (11 ounce) package (N/A)
Candy sprinkles or non-pareils
3 ounces (Approximately)
Cellophane party favor bags
24 (N/A)
Sheer ribbon
1 roll (Optional)
Instructions
1
Gather your ingredients and equipment: 24 flat bottomed ice cream cones, lollipops (or mini lollipops), pixie sticks, melting candy (or chocolate chips), candy sprinkles (or non-pareils), 24 cellophane party favor bags, and sheer ribbon (optional).
2
Melt the chocolate or candy according to package instructions until smooth. Use a microwave or double boiler for best results.
3
Using a pastry brush, generously coat the top and upper sides of each ice cream cone with the melted chocolate.
4
Immediately dip and roll the coated areas of the cones into the candy sprinkles, ensuring they are well-covered.
5
Place the decorated cones upright on a sheet of wax paper and allow them to cool completely until the chocolate hardens.
6
Once cooled, carefully fill each cone with a variety of candies such as Smarties, Twizzlers, or mini chocolate treats.
7
Insert a lollipop or pixie sticks into the center of each filled cone, pressing down gently to secure them in place.
8
Slide each cone into a cellophane party favor bag and tie them closed with a decorative ribbon if desired.
9
Display your Colorful Candy Cone Treats for your guests and watch as the kids' faces light up with delight!
Nutrition Information
Frequently Asked Questions
Frequently Asked Questions
What are Colorful Candy Cone Treats?
They are whimsical desserts and party favors made from decorated ice cream cones filled with assorted candies, inspired by a Food Network episode.
What occasions are these treats best for?
These treats are perfect for birthday parties, holidays, or bake sales.
How many ice cream cones are needed for this recipe?
The recipe requires 24 ice cream cones.
What type of ice cream cones should I use?
You should use flat-bottomed ice cream cones so they can stand upright.
What is used to coat the top of the cones?
Melting candy or chocolate chips are used to coat the top and upper sides of the cones.
How should I melt the chocolate or candy coating?
Melt the candy according to package instructions using a microwave or double boiler until smooth.
What tool is used to apply the chocolate to the cones?
A pastry brush is recommended for generously coating the cones.
When should the sprinkles be added?
Immediately after coating the cones with melted chocolate, dip and roll them into the sprinkles while the coating is still wet.
How do I ensure the chocolate hardens correctly?
Place the decorated cones upright on a sheet of wax paper and allow them to cool completely.
What can I use to fill the inside of the cones?
You can fill them with various candies like Smarties, M&Ms, Twizzlers, or mini chocolate treats.
How many lollipops do I need?
You will need either 24 regular lollipops or 72 mini lollipops.
How many pixie sticks are included in the recipe?
The recipe calls for 72 pixie sticks.
How do I secure the lollipops in the cone?
Insert the lollipop or pixie sticks into the center of the filled cone and press down gently to secure them.
How are the treats packaged for guests?
Each cone is slid into a cellophane party favor bag and tied closed with a ribbon.
Is the ribbon mandatory for this recipe?
No, the sheer ribbon is optional but adds a decorative touch.
How much melting candy is required?
The recipe uses one 11-ounce package of chocolate chips or melting candy.
How many sprinkles should I have on hand?
Approximately 3 ounces of candy sprinkles or non-pareils are needed.
Can I customize the colors of the treats?
Yes, the recipe allows for creativity by customizing candy fillings and decorative toppings.
Are these treats suitable for both kids and adults?
Yes, they are designed to bring joy to both kids and adults.
What is the first step in making these treats?
The first step is to gather all ingredients and equipment, including cones, candy, bags, and ribbon.
How many individual party favors does this recipe yield?
This recipe makes 24 individual candy cone treats.
What kind of sprinkles work best?
You can use standard candy sprinkles or non-pareils.
Where can I find melting candy?
Easy-to-work-with candy coatings can typically be found at craft stores.
Can I use Twizzlers in the filling?
Yes, Twizzlers are specifically mentioned as a great filling option.
What is the purpose of the wax paper?
The wax paper provides a non-stick surface for the cones to sit on while the chocolate coating hardens.
Are these treats good for bake sales?
Yes, they are highly recommended for bake sales due to their eye-catching appearance.
Should the cones be filled before or after the chocolate hardens?
The cones should be filled once the chocolate coating has cooled and hardened completely.
What kind of bags are used for packaging?
Cellophane party favor bags are used to wrap the individual cones.
Can I use mini chocolate treats as filling?
Yes, mini chocolate treats are an excellent choice for filling the cones.
Why are these called 'surprise' treats?
They are a surprise because each cone is filled with hidden assorted candies for the recipient to discover.