Cheesy Sloppy Joe Biscuit Cups
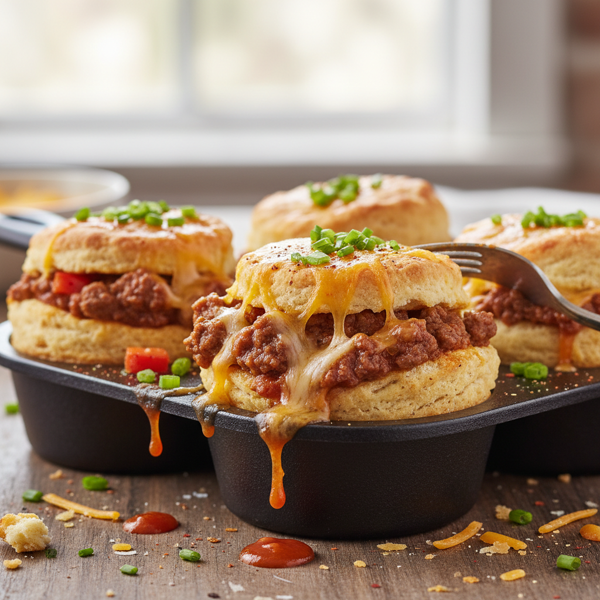
Transform your typical Sloppy Joe experience with these delightful Cheesy Sloppy Joe Biscuit Cups! This fun and easy recipe allows you to whip up a satisfying meal using pantry staples, making it perfect for a quick lunch or snack. Individual biscuit cups are not only bite-sized for little hands, but they also keep the mess to a minimum, allowing for a fork-friendly option. With juicy ground beef mixed with bell peppers, zesty ketchup, and spices, all encased in a fluffy biscuit shell, this dish is sure to please both kids and adults alike. Enjoy this delicious twist that makes the classic Sloppy Joe even more exciting and perfect for sharing!
6
Servings
N/A
Calories
15
Ingredients
Ingredients
ground beef
1 lb (browned)
onion
1 (finely chopped)
garlic cloves
3 (crushed)
green bell pepper
1/2 large (chopped)
red bell pepper
1/2 large (chopped)
ketchup
1 cup (none)
salt
1 teaspoon (none)
pepper
1/2 teaspoon (none)
barbecue seasoning
1/4 teaspoon (none)
brown sugar
2 tablespoons (none)
mustard
1 tablespoon (none)
water
1/2 cup (none)
Bisquick mix
2 1/4 cups (for biscuit cups)
milk
2/3 cup (for biscuit cups)
parmesan cheese
to taste (for topping)
Instructions
1
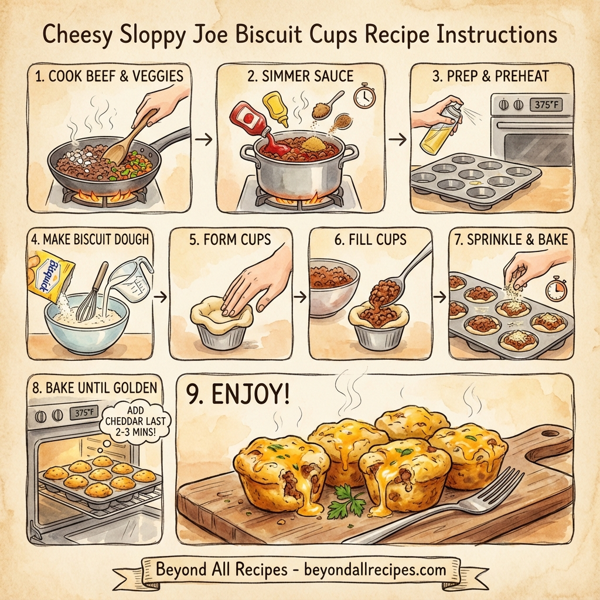
In a large skillet, drizzle some olive oil and heat over medium-high heat. Add the ground beef, chopped onion, crushed garlic, and chopped green and red bell peppers.
2
Cook until the beef is browned and the vegetables are tender. Drain any excess grease from the pan.
3
Stir in the ketchup, salt, pepper, barbecue seasoning, brown sugar, mustard, and water. Mix until well combined and allow to simmer for about 5-10 minutes, stirring occasionally.
4
While the meat mixture is simmering, preheat your oven to 375°F (190°C). Spray a muffin tin with non-stick cooking spray.
5
In a mixing bowl, combine the Bisquick mix and milk to create the biscuit dough as directed on the Bisquick packaging.
6
Using a spoon coated with non-stick spray, scoop the biscuit dough into each muffin tin, pressing it slightly to form a cup shape. Ensure the edges are well spread out.
7
Carefully spoon the Sloppy Joe meat mixture into each biscuit cup, filling them generously.
8
Sprinkle parmesan cheese on top of each cup before placing them in the oven.
9
Bake for 10-15 minutes or until the biscuit cups are golden brown and cooked through. If desired, add shredded cheddar cheese in the last few minutes for extra flavor.
10
Remove from the oven and allow to cool slightly before serving. Enjoy your Cheesy Sloppy Joe Biscuit Cups!
Nutrition Information
Frequently Asked Questions
Frequently Asked Questions
What are Cheesy Sloppy Joe Biscuit Cups?
They are a fun and easy twist on classic Sloppy Joes featuring a seasoned ground beef filling baked inside fluffy Bisquick biscuit shells.
How much ground beef is required?
The recipe calls for 1 lb of ground beef.
What vegetables are in the Sloppy Joe filling?
The filling includes finely chopped onion, crushed garlic, and both green and red bell peppers.
What seasonings are used for the meat?
The meat is seasoned with salt, pepper, barbecue seasoning, brown sugar, and mustard.
How do I make the biscuit dough?
Combine 2 1/4 cups of Bisquick mix with 2/3 cup of milk as directed on the packaging.
What temperature should the oven be set to?
Preheat your oven to 375°F (190°C).
How long do the biscuit cups bake?
Bake them for 10 to 15 minutes or until they are golden brown and cooked through.
How do I prevent the dough from sticking to my spoon?
Use a spoon coated with non-stick cooking spray to scoop the biscuit dough into the muffin tin.
What kind of cheese is used for the topping?
Parmesan cheese is sprinkled on top before baking, and shredded cheddar can be added in the final minutes.
Is a muffin tin necessary for this recipe?
Yes, a muffin tin is used to form the individual biscuit cups.
Should I grease the muffin tin?
Yes, you should spray the muffin tin with non-stick cooking spray before adding the dough.
Do I need to drain the meat?
Yes, you should drain any excess grease from the pan after browning the beef and vegetables.
How long should the meat mixture simmer?
The meat mixture should simmer for approximately 5 to 10 minutes.
How many servings does this recipe provide?
This recipe makes 6 servings.
Are these biscuit cups kid-friendly?
Yes, they are bite-sized for little hands and less messy than traditional Sloppy Joes.
Can I use ground turkey instead of beef?
Yes, ground turkey or chicken can be used as a substitute for ground beef.
What sauce base is used for the Sloppy Joes?
The sauce is based on ketchup mixed with water and various seasonings.
How much brown sugar is in the recipe?
The recipe uses 2 tablespoons of brown sugar.
Can I add extra cheese?
Yes, you can add shredded cheddar cheese during the last few minutes of baking for extra flavor.
Is this recipe suitable for lunch?
Yes, it is categorized as a perfect option for Lunch or Snacks.
How many ingredients are needed?
There are 15 total ingredients required for this recipe.
Can I use different colored bell peppers?
Yes, you can use any combination of red and green bell peppers.
What is the first step in the instructions?
Drizzle olive oil in a skillet and heat over medium-high heat to brown the beef and vegetables.
Is this a messy dish to eat?
No, the biscuit shell keeps the mess to a minimum, making it a fork-friendly option.
Can I make this with pantry staples?
Yes, many of the ingredients like ketchup, Bisquick, and seasonings are common pantry staples.
How do I form the cup shape in the muffin tin?
Scoop the dough into the tin and press it slightly to ensure the edges are well spread out.
Does the recipe use fresh garlic?
Yes, it calls for 3 crushed garlic cloves.
What is the purpose of the water in the sauce?
The 1/2 cup of water helps create the right consistency for the sauce as it simmers.
Can these be served as a snack?
Yes, they are great for quick snacks or sharing at gatherings.
Should the biscuit cups cool before eating?
Allow them to cool slightly after removing them from the oven before serving.